Secure Your Digital Life
The digital landscape is unpredictable, and not every surprise is a good one. Imagine waking up to discover that crucial files have disappeared—could you handle the impact? In today’s world, data backup isn’t a luxury; it’s a necessity. In this article, we will show you how to Backup and Restore Files in Windows.
Discover why safeguarding your data is crucial, the best methods to protect it, and effective steps to recover lost files when unexpected issues arise.
The Critical Importance of Data Backup: Why You Can’t Afford to Ignore It
The High Cost of Data Loss: Financial and Emotional Impacts
Losing digital files is more than just a hassle; it can be emotionally taxing, especially when the files are irreplaceable. The financial impact can also be significant, from the expenses of hiring data recovery professionals to lost business opportunities due to downtime.
Real-World Examples of Data Loss Scenarios and Their Consequences
Imagine a small business losing all client data because of a hardware failure. Without backups, the owner not only suffered a loss of income but also damage to their reputation.
Likewise, individual users risk losing cherished family photos or crucial documents due to accidental deletion or a malware attack.
Statistics on Data Loss and Recovery Costs
Here are some eye-opening stats:
- 30% of all computers are already infected with malware, making data loss common.
- 60% of small businesses that experience data loss shut down within six months.
- The average cost of data recovery can exceed $1,000.
These numbers illustrate the urgent need for a solid backup plan.
Choosing the Right Backup Strategy for Your Needs
Different Types of Backups: Full, Incremental, Differential
Knowing your backup options is key. Here’s a quick breakdown:
- Full Backup: A complete copy of all data. While secure, it takes the longest and uses the most space.
- Incremental Backup: Only backs up changes made since the last backup. This is faster but requires the last full backup to restore.
- Differential Backup: Backs up all changes since the last full backup, making restoration easier but taking longer than incremental.
Cloud vs. Local Backup: Weighing the Pros and Cons
Both cloud and local backups have benefits:
- Cloud Backup
- Pros: Accessible from anywhere, automatic updates, no physical space needed.
- Cons: Monthly fees, reliant on internet access, potential security concerns.
- Local Backup
- Pros: No ongoing fees, faster restoration, direct control over the data.
- Cons: Vulnerable to theft, physical damage, or loss.
Best Practices for Selecting Backup Software and Hardware
When picking software or hardware, consider:
- Ease of use
- Compatibility with your devices
- Security features, like encryption
- Customer support ratings
Some popular software options include Acronis, Backblaze, and EaseUS Todo Backup.
Backup and Restore Files Using “Backup and Restore” Method
Although the built-in backup features in Windows might not be perfect, you can still utilize them to create local backups on Windows 11.
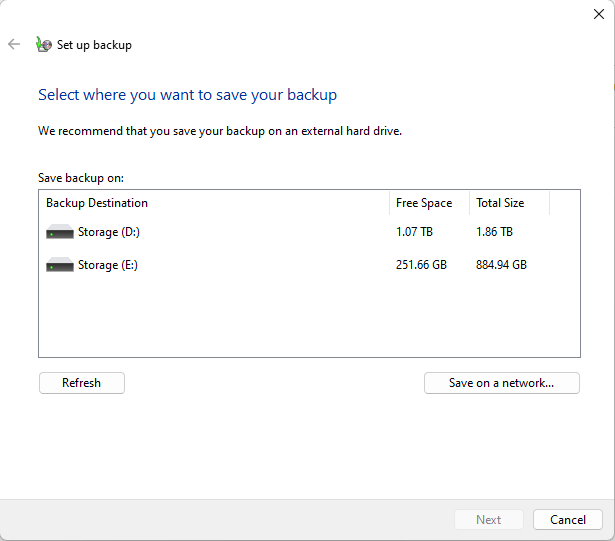
- Go to “Control Panel” → “System and Security” → “Backup and Restore (Windows 7)“
- Select “Set up backup” under the “Backup” section
- If asked, enter your admin passcode
- Select “Backup Drive” → click “Next“
- Select “Let Windows Choose” → click “Next” (this will back up user-associated files — Desktop files, Libraries, and default Windows 11 folders)
- Click “Save settings and run backup“
To restore files and folders, follow the steps below:
- Navigate to the “Backup and Restore” menu.
- Click “Restore my files” under “Back up or restore your files“
- Click “Browse for folders” → choose a folder → click “Add folder“
Repeat the above step until all folders under “Browse the backup for folders or drives” are added and appear on the “Restore files” list.
- Click “Next” under “Restore files” → click “Restore” to initiate data restoration
Backup and Restore Files Using “File History” Method
Follow these steps to back up individual files and folders using File History:
- Go to “Control Panel” → “System and Security“
- In System and Security, find Save backup copies of your files with File History, then click on it.
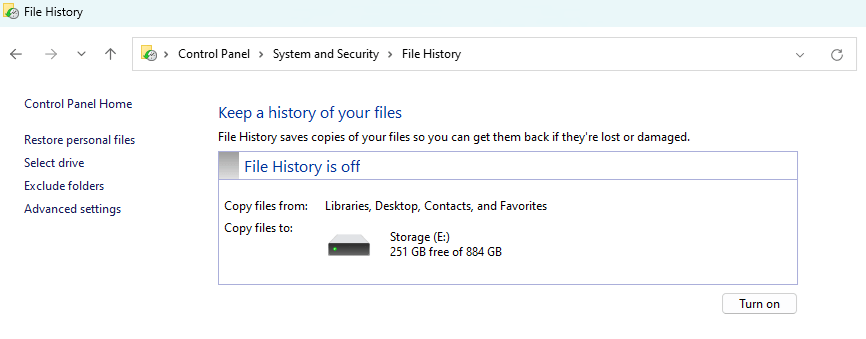
- Choose the storage device where you want to save your backup by selecting Select drive from the left-hand column. Once you’ve made your choice, click Turn on.
- To adjust your backup settings, click on Exclude folders and Advanced settings in the left-hand column.
- In the Advanced settings window, specify how frequently you want your data to be backed up, and how long you want to keep the backups.
- In Exclude folders, choose any folders in your Libraries, Desktop, Contacts, and Favorites that you don’t want to include in regular backups.
- To start backing up right away, click Run now, or simply close the window and let your scheduled automatic backup take over.
To restore files with File History, follow the steps below:
Once you’ve backed up your files with File History, you can easily retrieve them whenever necessary. Here’s how to restore your files using File History:
- Open up Control Panel
- Navigate to System and Security and select Save backup copies of your files with File History.
- In the left-hand column, click on Restore personal files.
- From the list of available files, choose the ones you want to recover and click the green button to complete the restoration.
Automating Your Backup Process for Effortless Protection
Most software allows scheduling. This means you can set it and forget it. Choose daily or weekly backups to maintain peace of mind.
In windows, you can create regularly scheduled backups with System Restore.
- Open the “Control Panel,” type “Recovery” in the search bar at the top right, and select “Recovery” from the search results.
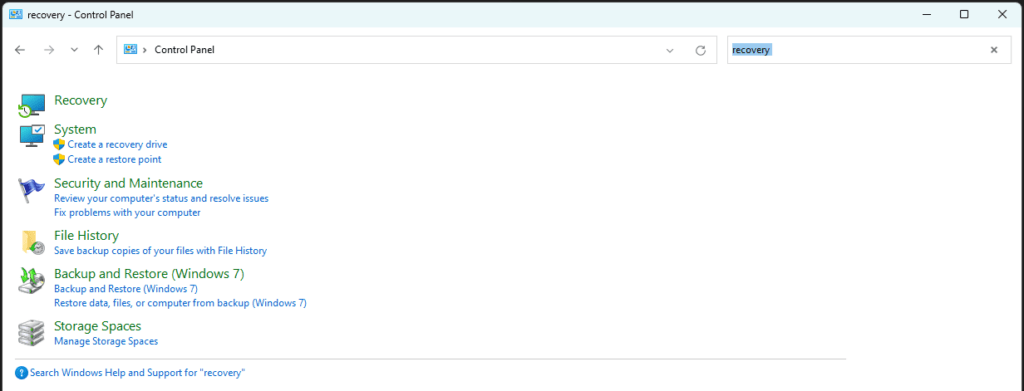
- Click on “Configure System Restore.”
- In the System Properties window, go to the “System Protection” tab. Under the “System Protection” box, select the drive you want to set up, and click “Configure.”
- Enable “System Protection” under the “Restore Settings,” then allocate the desired space for backup data.
- Click “Apply” and then “OK.” Your system will now automatically create restore points at regular intervals.
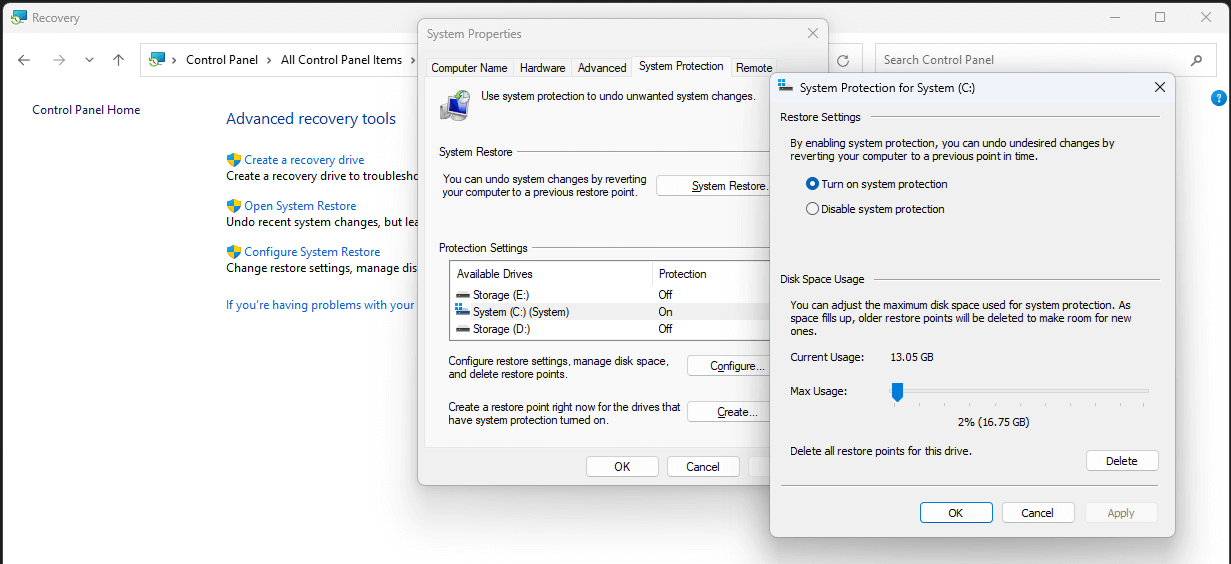
- If you want to create an additional restore point, click the “Create” button below “Configure”. Enter a name for the restore point in the pop-up window, and then click “Create.”
After creating one or more restore points, you can revert your system’s settings to those saved times if needed.
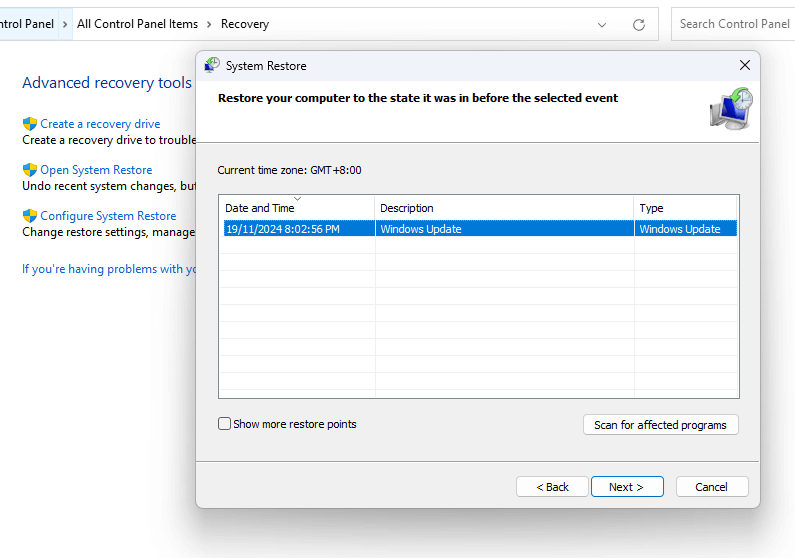
- Type “Control Panel” in the Windows search bar and open the application.
- Enter “Recovery” in the search bar at the top right and choose “Recovery” from the results.
- Click on “Open System Restore.”
- Click “Next” and select the restore point you want to revert to.
- To see which applications and drivers will be affected, click “Scan for affected programs.” If you’re okay with the changes, click “Next.”
- Confirm your chosen restore point and click “Finish” to complete the process.
Key Takeaways: Protecting Your Data for the Long Term
Actionable Steps to Implement a Robust Backup Strategy
- Choose a backup type that suits your needs.
- Invest in reliable backup software or hardware.
- Automate your backup process and test restoration regularly.
Resources for Further Learning and Support
- Backup software websites: Many provide guides and FAQs.
- Online courses and tutorials: Sites like Udemy and Coursera offer courses on data management.
- Tech support forums: Engage with communities for shared experiences.
The Importance of Regular Backup Testing and Maintenance
Regularly test your backups to ensure they work. Schedule checks every few months to stay prepared. By taking these steps, you can secure your digital life against data loss. Don’t wait for a disaster; act now and protect what matters most.
If you accidentally deleted some files without backing them up and want to recover them, consider checking out this article. “How to Recover Files on Windows, Tips and Tricks“. Users may still encounter common issues like file loss. Files can become deleted or inaccessible due to several factors.


